Different types of texture maps:
- Diffuse Map
- Opacity Map
- Bump Map
- Normal Map
- Specular Map
- Glow Map
- Reflection Map
- Transparency Map
- Alpha Map
- Ambient Occlusion Map
- Diffuse Map
Diffuse maps are the most frequently used of the texture mapping methods which defines the colour and pattern of the object. Bitmap images like scanned images or images taken by a digital camera can be used as a diffuse map. You can also use the an image programme to make pre-rendered texture effect, you can use effects such as shadowing, bump, lighting, weather effects and bevel.
Using this method can simulate real 3d effects whilst saving a lot of system resources and rendering time effectively. Here are some photographs of Diffuse Maps:


Tips:
- Cracks or holes have been darkened by painting or by an occlusion map.
- UV maps are laid out so that there is a suitable understanding of space utilization and stretching.
- Base texture features are crisp colour or contrast to interpret variations in shapes to break the image up.
- Non of the directional lighting information is baked.
- Opacity Map
Opacity maps use black and white values. They also use alpha channels to make areas of a material transparent. This is useful for creating materials like the mesh materials for objects that have holes in them. When using the opacity map the black parts will be completely cut out but the white parts will be fully visible. The grey values depend on the transparency level of the object.
Opacity modes can be put into 3 methods; Alpha, Colour and Inverse colour.
Here are some photographs of some Opacity maps:


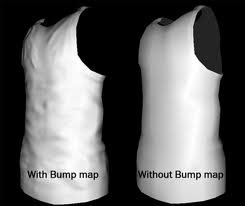
- Bump Maps
Bump maps is a method for simulating bumps and wrinkles on a surface of an object. This is done by disturbing the surface normal of the object and using the disturbed normal during lighting calculations. Bump map uses the grayscales in an image map to create variations in the shading of the surface. This added more detail to the 3D models but doing so without having to increase the number of polygons.
Although bump mapping is a technique to make rendered surfaces look more realistic the surface geometry isn’t modified unlike the displacement map. Even though bump mapping is similar to displacement mapping, bump mapping is much faster and doesn’t use as many resources as the displacement map does. Also you get the same amount of detail as you would on a displacement map.
Here are some photographs of some bump maps:


- Normal Map
A normal map is made from an high polygon model. Normal maps used for faking the lighting of bumps and dents of objects. The technique is used to add more detail without having to use more polygon. The colour rendering will affect the surfaces such as a regular bump map whilst producing more detail.
When you are using iclone you can import normal maps which are created in either Zbrush or 3d studio max. Then you can create simple low polygon models using normal map and they look like high detailed 3D objects. BUT if you load an image that isn’t specially designed normal map the outcome will not be as good.
Here are some photographs of some Normal Maps:


- Specular Map
Specular mapping is an important element in finding out the brightness of specular highlights as well as shininess to find out the size of the highlights. This particular method allows certain parts of the object to have a specular effect.
It is often that the specular reflection of light from other surfaces is ignored, this is due to the more concentrated computations need to calculate it. And therefore the specular reflection of light straight from the point light sources is modelled as specular highlights.
Here are some photographs of Specular maps:


- Glow Map
This texture mapping technique allows you to control the glow, shape, colour and strength. This is a method that is used when you want specific objects to glow in the dark. The objects you want to glow in the dark will be a grey scaled version of what your object whilst the things you don’t want to be glowing in the dark will be black.
When you are using glow maps the glow map will blend with the original diffuse map this is done so that the lighter the diffuse map or glow map colour the stronger the glow effect will be. But when you have a bright diffuse map with a bright glow map the outcome might caught over exposure.
Here are some photographs of Glow Maps:


- Reflection Map
Reflection maps are also known as environmental maps. This method is where the image map is projected onto a 3D surface to show a reflection of the environment. This method is an well organized image based lighting technique for finding out the appearance of a reflective surface. The texture is used to store the image of the distant environment surrounding the rendered object.
When creating a good quality reflective effect always start by using an object which has a high specular highlight and gloss values. But most 3D blocks are shown with a non glossy material setting.
When you place a reflective object on a 2D background you will be able to use high contrast scenery images to copy the reflection by importing them as reflection map.
Here are some photographs of some Reflection Maps:


- Transparency Map
Transparency maps are similar to a reflection map except transparency maps tell the software which parts of the object should be transparent. This method is use for a surface that would be hard to duplicate. So with Transparency instead of modelling the objects individually can be very convincing just as long as the model isn’t too close to the foreground and it uses a lot less polygons.
But a lot of the time mapped reflection is only an approximation of the real reflection. Transparency mapping is normally the fastest method of rendering a reflective surface. Transparency mapping is similar to Opacity mapping.
Here are some photographs of Transparency Maps:


- Alpha Map
This method is where a texture is applied to an object in 3D Computer Generated Imagery ( CGI ) which often creates certain parts of the object to be transparent. Alpha mapping is similar to Transparency mapping and Opacity mapping.
Alpha mapping can come across as being complicated but it is fairly simple because when objects in 3D CGI are made as a chain of either shapes or polygons that are joined together to make a bigger shape.
Here are some photographs of some Alpha maps:


- Ambient Occlusion map
Ambient Occlusion is a rendering method which is used to figure out how exposed a point in a scene is to ambient lighting. The edge of the inside of the object will be more occluded and darker than the open outer surfaces so the deeper you go inside of the object the more darker and occluded it will get.
When you have open sky this is done by figuring out the amount of visible sky for every point but the indoor environments only the objects within a specific area are taken note of. The walls are thought to be the start of the ambient light.
Here are some photographs of Ambient Occlusion maps:


References:

Recent Comments